Funny Baking (with or without kids)

sister herb

Official TTI Chef
Run! It is a Snake!

= Keep Funny in Your Kitchen!

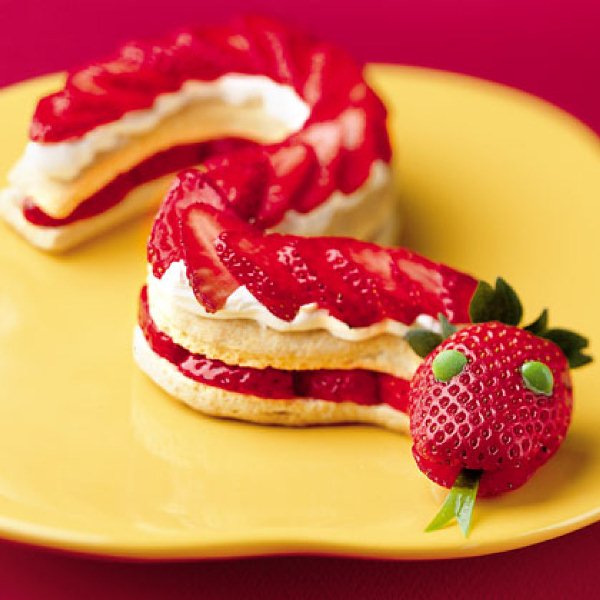
Strawberry Shortcake Snake
Strawberry-Snake.jpg


Shortcake biscuits:
  • 2 cups all-purpose flour
  • 2 tablespoons confectioners’ sugar
  • 4 teaspoons baking powder
  • 3/4 teaspoon salt
  • 1/2 cup margarine (1 stick)
  • 1 cup milk
Strawberry filling:
  • 1 quart strawberries
  • 4 tablespoons confectioners’ sugar
Whipped cream topping:
  • 1 cup whipping cream
  • 2 tablespoons confectioners’ sugar
Garnishes:
  • 4 whole strawberries
  • Green fruit leather
  • Mini chocolate chips or M&M’s
How to make it
1) Heat the oven to 400 degrees F. Sift together the flour, sugar, baking powder and salt into a large mixing bowl. Cut in the margarine with a pastry cutter. Or use a vegetable grater to grate the stick into the mixing bowl and let your kids take turns blending the margarine into the dry ingredients with their fingertips. Once the dough is crumbly, slowly stir in the milk.

2) Turn out the dough onto a floured working surface and gently roll or pat the dough into a 1-inch-thick rectangle (it should measure about 6 x 8 inches). For the best results, handle the dough as little as possible.

3) Slice the rectangle into four 1-1/2- x 8-inch strips. Place the strips on an ungreased baking sheet, then let your child mold and curve them into S shapes that resemble snakes. Bake for 10 to 12 minutes until the bottoms are golden brown. Transfer the baked shortcakes to a wire rack (a parent’s job) and let cool. Carefully slice the cooled shortcakes in half lengthwise or split them with a fork and then set aside.

4) Wash the strawberries and let your kids select four to use for the snakes’ heads. Slice the rest of the berries lengthwise into a mixing bowl. Toss with the confectioners’ sugar and let stand while you prepare the whipped cream.

5) Combine the whipping cream and confectioners’ sugar in a chilled bowl and beat with an electric or hand mixer until stiff peaks form.

6) Just before serving, arrange berries on the bottom half of each shortcake, then cover with the shortcake top. Spread on whipped cream and add a layer of sliced strawberry “scales.”

7) For the snakes’ heads, cut mouth openings in the tips of the whole berries and place one at the end of each shortcake. Press a pair of mini chocolate chip or M&M’s eyes into the sides of each head and add a forked tongue cut from green fruit leather.

Serves 4.

Source: http://www.goodshomedesign.com/delicious-strawberry-shortcake-snake/
 

sister herb

Official TTI Chef
Chocolate Chip Cookie Ice Cream Bowls

sugar-cookie-bowls.jpeg


The kitchen is a place where you can surprise even yourself, not only guests at your dinner party. What in the world is this about? Thinking out of the box for a change! It’s important to be creative when making meals and improving recipes. This article will point out that you can use and ordinary muffin pan to bake some Chocolate Chip Cookie Ice Cream Bowls. Yes, that’s no mistake in writing – bowls. Grab these items:

• non-stick muffin pan;
• cookie dough (some recipe from the C is for cookies- thread for example or some your favourite one);
• chocolate chips;
• ice cream;

Maybe you’ve seen those mini-tarts at a baker’s window-shop and drooled a bit, before being struck by the thought you could do that at home. The trick is to use the other side of the muffin pan. Clean it up thoroughly and leave it to dry before working with it. Mix the chocolate chips in the dough and roll out to appropriate size. Put each of your future mini-tarts over the forms of the upside-down pan. Press gently and use a knife to remove any excess. Bake in the oven until they become a golden brown color. Leave to cool and serve with tasty ice cream scoops in them!

http://www.goodshomedesign.com/chocolate-chip-cookie-ice-cream-bowls/
 

sister herb

Official TTI Chef
Butterfly Roll-Up Cookies


Making the same recipe of cookies, again and again, gets really boring at some point. Why not try something different for a change, while still keeping the traditional line of cookie making? The following tutorial will learn you how to make some tasty butterfly roll-up cookies. You will need:

• powdered sugar, 1 cup;
• baking powder, 1 teaspoon;
• margarine, 3/4 of a cup;
• flour, 2 cups;
• corn starch, 1 cup;
• vanilla extract, 1 teaspoon;
• cocoa, 1 1/2 tablespoons;
• 1 egg;

As said before, the recipe is based on a traditional and simple cake but with a creative twist. First, stir in all, but the cocoa, in a bowl in order to prepare the dough, while the oven is preheated to 350 degrees Fahrenheit. When the ingredients are combined in a nice mixture separate into two balls of equal size. Take the cocoa and add it in one of the balls. Put the pair of dough wrapped in some plastic for about 30 minutes in the fridge.

Remove from cooling and spread the balls into rectangles, with the cocoa layer underneath the simple one. Slice in half with a knife and roll up each of them. Press them next to each other in order to look something like a fat or bloated butterfly. Take the knife again and cut into pieces. Take each slice and press a bit together with your fingers. It should look like a proper butterfly now. Place onto a tray and bake for some minutes. Yummy and creative!

http://www.goodshomedesign.com/butterfly-roll-up-cookies/
 

sister herb

Official TTI Chef
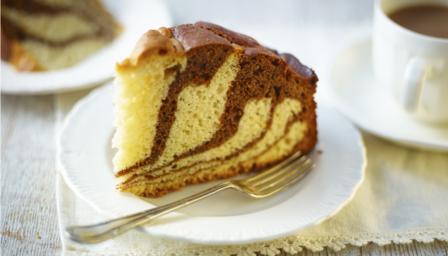
Zebra cake
images


zebra_cake_76226_16x9.jpg


Jazz up afternoon tea with this eye-catching stripy cake – super easy once you know the trick.

Ingredients

  • butter, for greasing
  • 4 large free-range eggs
  • 250g/9oz golden caster sugar
  • 100ml/3½fl oz milk
  • 250ml/9fl oz sunflower oil
  • 1 tsp vanilla extract
  • 475g/1lb 1oz self-raising flour
  • 1 tsp baking powder
  • 25g/1oz cocoa powder
Preparation method
  1. Preheat the oven to 180C/350F/Gas 4. Butter a 23cm/9in cake tin.
  2. Put the eggs and sugar into a large bowl with the milk, oil, vanilla extract and 175g/6oz of the flour. Whisk with a hand held electric whisk for a minute or two, until smooth.
  3. Pour half of the mixture into a separate bowl and stir in ½ tsp baking powder and 175g/6oz flour and set aside. In the other bowl, mix the cocoa, 125g/5oz flour and ½ tsp baking powder.
  4. Spoon two tablespoons of the plain mixture into the centre of the cake tin. Straight away spoon two tablespoons of the chocolate mixture on top. Continue doing this until all the mixture has been used – you will end up with lots of alternate rings of mixture in the tin. Don’t worry if it’s not very neat.
  5. Cook for 40-50 minutes, until the cake is cooked through – a skewer inserted into the centre should come out clean. Turn the cake out onto a wire rack to cool before serving.

http://www.bbc.co.uk/food/recipes/zebra_cake_76226

----------------------------------------------------------------------------------------------
  1. Use one tablespoon for each batter to create the layers of batter on the prepared pan. Begin from the middle of the pan, take one spoon of white batter then over it add a spoon of chocolate batter and repeat this steps until all batter has been used. (If you don't have the patience to make these layers just add one batter on top of the other and create swirls with a knife or fork to create the marbled effect)
IMG_3983detail3.jpg


IMG_3987detail4.jpg


http://www.homecookingadventure.com/recipes/zebra-cake
 

sister herb

Official TTI Chef
spider.gif
Fudge Brownies for Spider Bites


Spider-Bites_Article-666x454.jpg


Ingredients:
4 oz. unsweetened chocolate, chopped
1 cup butter
2 cups sugar
4 eggs
1 teaspoon vanilla
1 1/2 cups all-purpose flour

Directions:
1. Preheat oven to 350 degrees and grease an 8-inch square baking pan.
2. Heat butter and chopped chocolate in microwave on low. Microwave in 30 second intervals, stirring in between until melted and smooth.
3. In a mixer, add sugar, eggs, and vanilla. Mix until combined.
4. Add the melted chocolate and butter to the sugar mixture and mix until combined.
5. Add flour and mix until combined.
6. Spread the brownie batter in greased pan and bake for about 40 minutes or until done.
7. Let cool.

If you want, you can also use brownies from a box mix and just follow the decorating instructions below.

Makes 25 spider bites, more if your roll into smaller balls.

After the brownies are cooled, (they can be still be slightly warm) cut 25 equal brownie squares, trimming off the outside edges first. This will help when you start to roll them.

These brownies were so moist and moldable already, I decided to try rolling them without using any frosting. And it worked out just fine. The brownie balls in the photo above are all brownie and actually pretty easy to roll. The only hard part is trying not to pop them in your mouth before you get to the actual decorating.

To decorate:1-2 16 oz. packages of chocolate candy coating (also called confectioner’s coating, candy melts or bark coating)
10 licorice wheels
50 raspberry gumdrops (you can also use m&m’s or other red candy)
Black non-nonpareils
Confetti color stick sprinkles

Prepare the licorice legs first. Unroll one licorice wheel at a time and cut it into as many 2 3/4 inch sections as you can. See how the strand is doubled up in the picture above. You can separate each strand of licorice by pulling apart the two pieces. Start on one end and pull the two pieces apart, leaving them attached at the other end.

Repeat until you have four pairs of legs for each spider body. (totaling eight licorice legs each.) Set them aside until ready to use.

Prepare the raspberry gumdrop eyes second. All you do for these is cut small pieces of the leftover licorice and press directly into the tops of these raspberry candies. The candies are soft, so don’t be afraid to press down firmly to get the licorice pieces to stay.

Start dipping! Place the candy coating in a small, deep microwave safe bowl. Heat in the microwave on low in 30 second intervals, stirring in between. Repeat until melted and smooth. Don’t overheat the chocolate.

Drop the ball in the bowl of chocolate coating. Don’t stir or move it around. Then cover it by spooning more melted chocolate over the top, completely covering the brownie ball.

Then, using the same spoon, lift it out of the chocolate and tap the handle of the spoon on the edge of the bowl. This will force any excess chocolate off the ball and back into the bowl. When most of the excess has fallen off, transfer the ball to a wax paper covered cookie sheet and immediately sprinkle a few black non-nonpareils on top. Repeat with remaining brownie balls.
Let the spider bodies dry completely before applying the rest of the decorations.

Use the remaining chocolate candy coating to attach the licorice legs and candy eyes. You won’t need much, so just reheat what is left in the bowl that you used for dipping. Place the top (attached) part of the licorice leg pair in the coating and then attach it to the side of the spider body. Hold in place for a few seconds while the chocolate sets. Repeat with remaining legs. Don’t move the spiders until the coating has completely set with the legs attached.

Then, use more candy coating to attach the raspberry candy eyes and let dry.

For the finishing frightening, touch, insert two sprinkles for fangs.

Source: http://www.pauladeen.com/index.php/...e_halloween_treats_creepy_crawly_cute_treats/


You just need some basic ingredients to make the brownies.


These are gonna be good.


So good that I wanted to stop here and eat them. All of them.


But no. Then I’d have to make another batch of brownies to roll.


Licorice wheels. I blame you.
There’s something about these things that make me want to unroll them and stick them in food.
Did I mention that I don’t even like licorice?


Admit it. You want to play with them, too.


These are raspberry and blackberry gumdrops. The red ones make great spooky eyes.

4044383731_fc631fa768_o.jpg


Source: http://www.bakerella.com/spiders-spiders-spiders/#fhbVIIlksFiui5SP.99
 

sister herb

Official TTI Chef
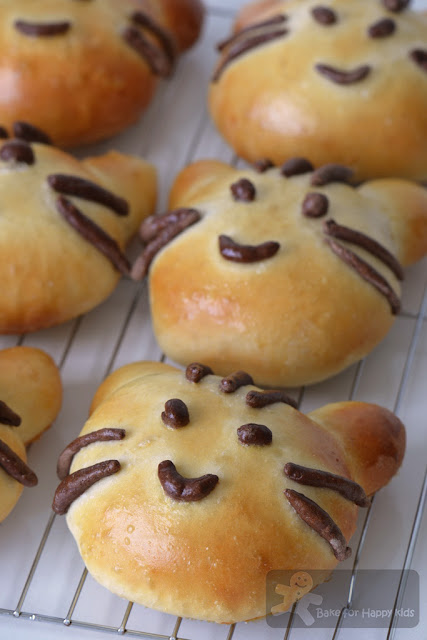
Cat Tuna Bread Buns

DSC_00671.jpg


Makes 6

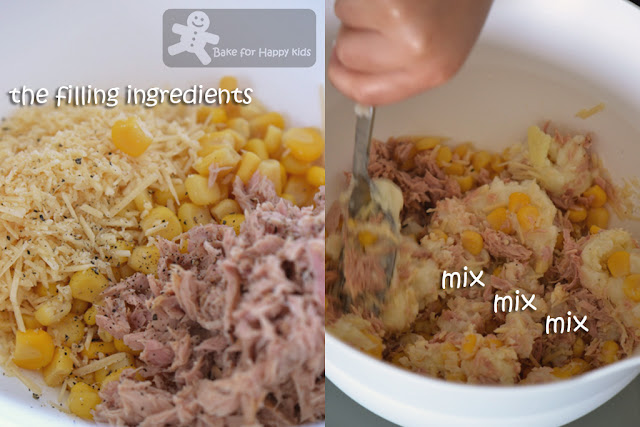
The tuna filling
1 can tuna (95g)
1 potato, boiled, mashed with 15g milk powder
3 tbsp corn kernel
a pinch of freshly ground black pepper
a pinch of salt
2 tbsp Parmesan cheese
2 tbsp freshly squeezed lemon juice

Mix all and divide into 6 equal portions.

The bread dough
270g bread flour
30g all purpose flour
1/2 tsp yeast
1 egg
20g sugar
1/8 tsp salt
20g olive oil
150ml water

The chocolate dough
100g bread flour
1/4 tsp yeast
1/2 tsp sugar
60ml water
1 tbsp cocoa powder

Egg wash
1 egg
1-2 tbsp milk

Instead of kneading by hand as illustrated in the book, I've placed all my ingredients into my bread-maker and use "dough" setting to knead and prove the bread and chocolate dough for 1 hr.

Divide dough into 6 large portions which is about 60g each and 12 small portions which is about 15g each. Shape them into round shape and cover them with moist cloth and allow them to rest for 10 min. the large portions makes the face of the cat.

Flatten each large dough into a flat oval shape. Place each portion of tuna filling in the center of the dough and pinch the edges together to enclose it.

Roll and shape two of the small doughs into teardrop shapes. Arrange two small doughs into lightly oiled baking tray with their pointed sides pointing upwards and place the large dough with its seam side down onto 30% of the two small doughs to form a cat face. Repeat to form the rest of the cat faces.

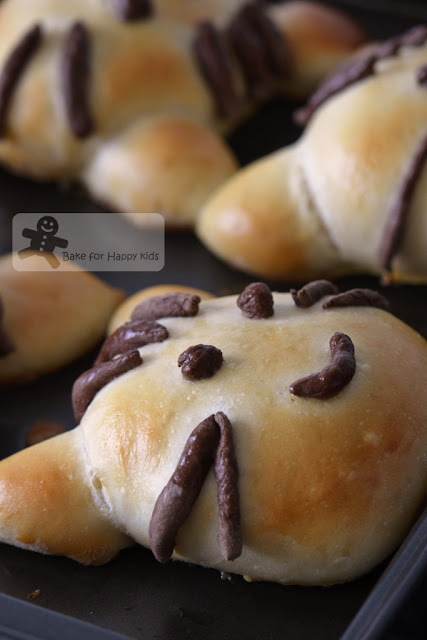
Roll chocolate dough into skinny ropes. Cut and place them onto each face and decorate them accordingly.

Prove the bread for another 50-60 min or until the cat faces grow puffy.

Preheat oven to 180°C or 160°C fan forced. Brush the bread with egg wash and bake them at 180°C or 160°C fan forced for 18min. (Note: Baking without fan-assisted oven: +200 to 225 C might be average temperature.)

Remove the bread buns from baking tray and allow them to cool completely on a wire rack.

Happy Baking!

Mashing the boiled potatoes:

pic11.jpg


Making the tuna filling:

pic+21.jpg


Shaping and decorating the bread - the chocolate dough for decoration is not sweet at all.

pic31.jpg


Freshly baked from the oven:

DSC_00581.jpg


Source: : http://www.bakeforhappykids.com/2013/04/funny-cat-tuna-bread-buns.html#sthash.YfNrpZDM.dpuf
 

sister herb

Official TTI Chef
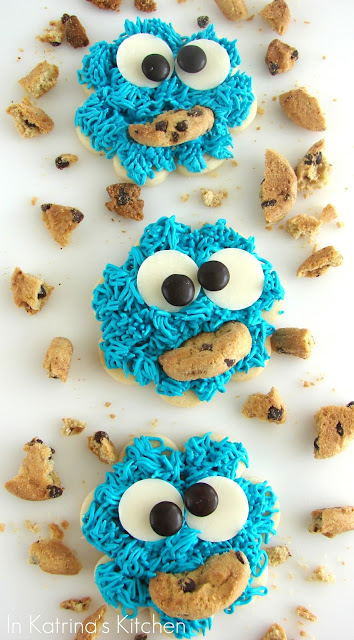
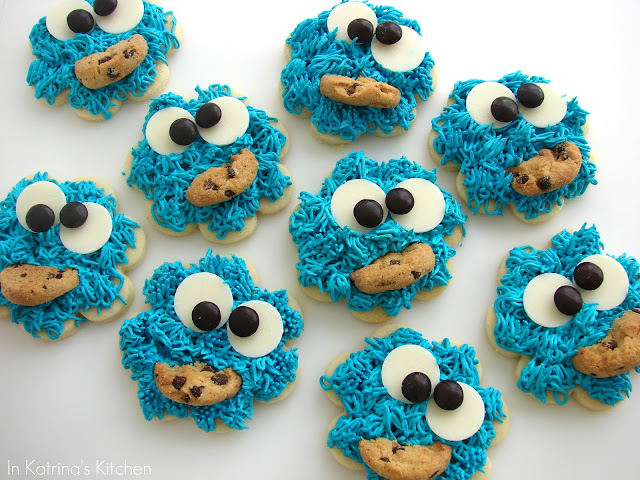
Cookie Monster Cookies
slyheart.gif


Apri2011+049pwm.jpg


cookiemonster+017pcropwm.jpg


cookiemonsternumberedwm.jpg


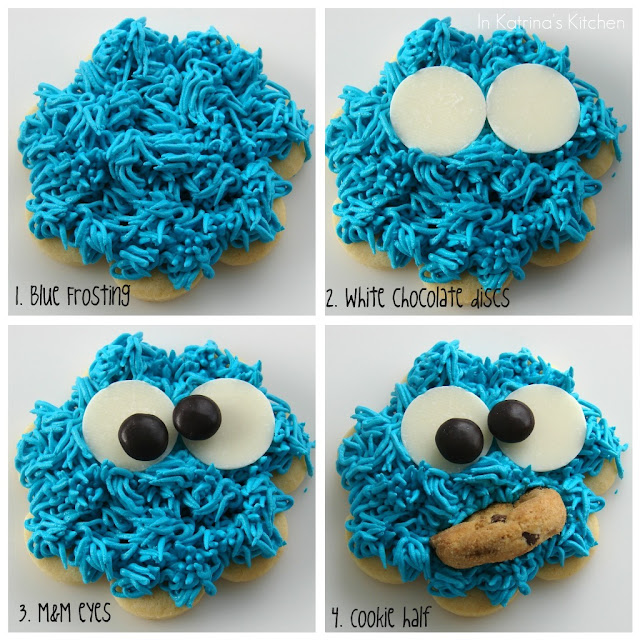
Pipe the blue hair buttercream. Add white chocolate and M&M eyes. Eat all of the other M&M colors. Insert a broken chocolate chip cookie. Multiply and you’re done!

Apri2011+055pwm.jpg


Basic Sugar Cookies and Basic Almond Buttercream Frosting

No-spread cut out cookies frosted with a crusting almond buttercream icing

Ingredients:
For the Cookies:
  • 2 cups of butter, softened
  • 2 cups of sugar
  • 2 teaspoons of vanilla extract
  • 1 teaspoon of almond extract
  • 2 eggs
  • 4 teaspoons baking powder
  • 6 cups flour
For the Frosting:
  • 2 Cups shortening
  • 1 Tablespoon vanilla extract
  • 1 teaspoon almond extract
  • 8 Cups powdered sugar
  • 1/8 Cup heavy cream (more or less to desired consistency)
  • blue food coloring, if desired
Directions:
For the Cookies:
  1. Preheat oven to 350 degrees F/175 C.
  2. In the bowl of your mixer cream butter and sugar until smooth.
  3. Beat in extracts and eggs.
  4. In a separate bowl combine baking powder with flour and add a little at a time to the wet ingredients. The dough will be very stiff. If it becomes too stiff for your mixer turn out the dough onto a countertop surface. Wet your hands and finish off kneading the dough by hand.
  5. DO NOT CHILL THE DOUGH. Divide into workable batches, roll out onto a floured surface and cut. You want these cookies to be on the thicker side (closer to 1/4 inch rather than 1/8).
  6. Bake at 350 F/175 C for 6-8 minutes. Let cool on the cookie sheet until firm enough to transfer to a cooling rack.
For the Frosting:
  1. In the bowl of your mixer beat shortening until smooth and creamy.
  2. Mix in vanilla (and almond extract if using).
  3. Add powdered sugar (1 cup at a time) until combined, then add cream & mix until smooth and spreading consistency. Adjust cream to desired frosting thickness
  4. Add a few drops of color, if desired.
Notes:
For the Cookies:
  • If you must chill the dough just leave it on the countertop for 10 minutes before rolling or work the dough with your hands for a few minutes.
  • I hesitate to put a recipe yield on cut out cookie recipes because the yield varies with the size of cookie cutters being used. This recipe makes a LARGE amount of dough. It can easily be halved to meet your needs.
For the Frosting:
  • This frosting dries soft but firm- okay for stacking (may crush a little). You can let the frosted cookies dry uncovered on the countertop overnight (the frosting acts as a barrier and will keep the cookies soft and fresh.
  • Use clear vanilla in the frosting if you need pure white.
  • Half the shortening may be replaced by half butter but it will change the consistency and not dry as firm.
  • Use more or less cream (or milk) to reach your desired consistency for piping or spreading.
  • To get this color of blue I used Americolor gel paste in Electric Blue.
Apri2011+059p.jpg


Source: http://www.inkatrinaskitchen.com/2011/04/cookie-monster-cookies.html

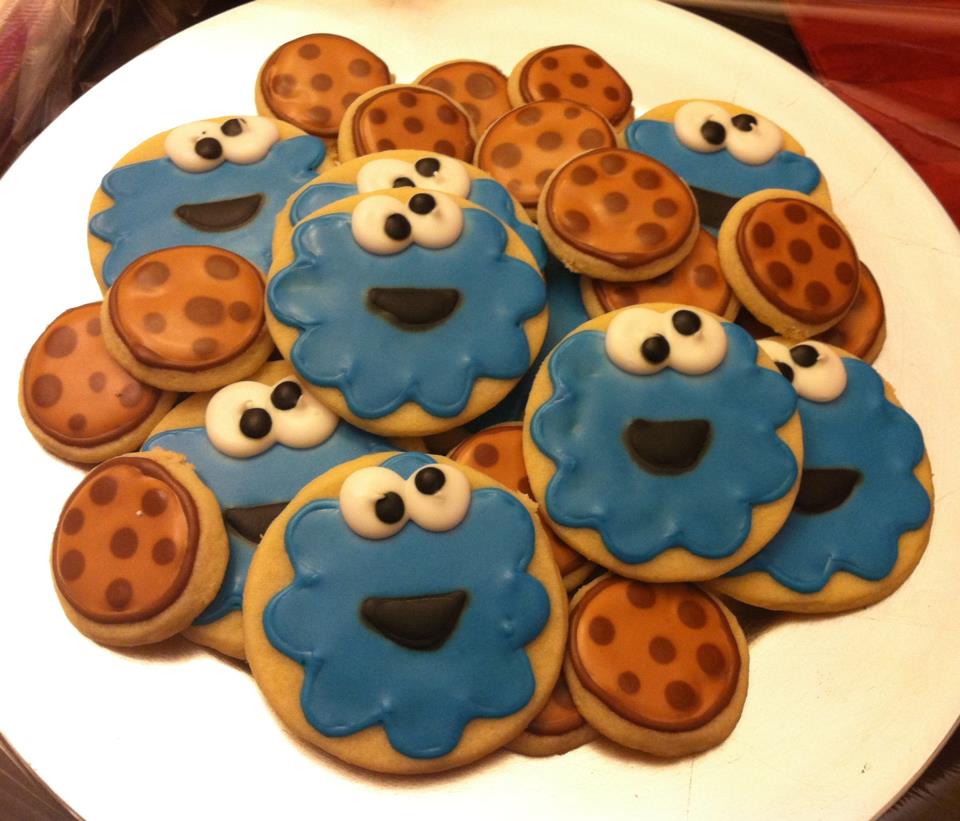
Note: flat surface of the cookies is ok too:

cookie+monster+cookies.jpg
 
Last edited:

sister herb

Official TTI Chef
Melted Snowman Cookies

melting-snowman-cookies.jpg


You need:

cookies (any kind)
marshmallows
powdered sugar + water (Mix until you get a suitable paste, which you spread on cookies.)
candies
(melted chocolate for hands - optional)
(food colors - optional)

Pictures tell how to decorate your cookies.

MeltingSnowmenGroup-1024x768.jpg


c7160fec069eb7ebac38826268069d5d.jpg
 

WannabeHijabi

بسم الله الرحمن الرحيم
The melted snowmen made me laugh so much....these are all awesome ideas! Love them. Might try some of these for fundraisers.
 

sister herb

Official TTI Chef
Teabag Cookies

ani%20smart%20cookies.jpg


  • 3/4 cup butter or margarine, softened
  • 2/3 cup powdered sugar
  • 1 egg yolk
  • A pinch of salt
  • 2 1/3 cup flour
  • thick white thread embroidery cotton type
  • labels
  • chocolate
In a large bowl, add the softened butter cut into pieces and work until mixture resembles ointment.

Add the icing sugar and mix vigorously with a wooden spoon until it becomes creamy and smooth.

Add the egg yolk and mix thoroughly until everything is well incorporated.

Sift the flour and salt and gradually incorporate just enough to form a paste with no trace of flour.

Form a ball with the dough, coarsely crush in disk and wrap with plastic wrap. Place in the fridge to firm up for a minimum of a half hour.

Preheat oven to 350 degrees F/175 C. Line a baking sheet with with parchment paper.

Lightly flour the work surface. Spread the dough to a thickness of about 5 mm.

Using a template (a tea bag shape reproduced on cardboard), cut out biscuits and place them on the cookie sheet about an inch apart from each other


With the tip of a small straw, make a hole about 1 cm from the top of the cookie.

If possible, refrigerate the cookies on the baking sheet for twenty minutes: it will allow them not to spread and retain their shape.

Bake (center position) and bake the cookies about 15 to 18 minutes: the cookies should remain quite pale with gold trim (the bottom should be light brown). Let cool 5 minutes then using a spatula pour the biscuits on a wire rack and leave until completely cooled.

Assemble the cotton thread and label on each cookie.

Melt chocolate and dip the cookies halfway up and place on a sheet of parchment paper. Allow to dry.

Source: http://www.semerjianinteriors.com/comments/42/blog.pl
 

sister herb

Official TTI Chef
Bunny Carrot Cookies

final-450x337.jpg


Ingredients


Cookie

1 cup sugar
1 cup butter, softened
1 egg
3 cups all-purpose flour
1/2 cup finely shredded carrot
2 teaspoons cream of tartar
1 teaspoon baking soda
1 teaspoon vanilla
1/4 teaspoon salt

Frosting

2 cups powdered sugar
1/4 cup butter, softened
1 teaspoon vanilla
2 to 3 tablespoons milk
Miniature marshmallows, if desired

Directions

Heat oven to 350 F/175 C. Combine sugar, 1 cup butter and egg in large bowl. Beat at medium speed until creamy. Reduce speed to low; add all remaining cookie ingredients. Beat until well mixed.

To shape bunnies, roll dough into 30 (1-inch) balls, 30 (3/4-inch) balls and 60 (1x1/4-inch) logs. For each cookie, place 1 (1-inch) ball onto ungreased cookie sheet; top with1 (3/4-inch) ball and 2 logs for ears. (Make sure dough pieces are touching so that bunny is formed during baking.) Bake for 10 to 13 minutes or until lightly browned around edges

Combine powdered sugar, 1/4 cup butter and vanilla in small bowl. Beat at low speed, gradually adding milk, until desired spreading consistency. Place frosting in pastry bag fitted with decorator tip. Pipe faces onto cookies, as desired. Attach marshmallows for tails using frosting, if desired.

---------------------------------------------------

grate-carrot-450x337.jpg


Next, combine the dry ingredients in a large bowl, and give them a whisk.

sift-dry-ingredients-450x337.jpg


In a separate bowl, combine the butter, egg, and sugar. Mix on medium speed until creamy.

mix-butter-sugar-and-egg-450x337.jpg


With the mixer on low speed, slowly add the dry ingredients to the butter mixture. Mix until the dough just comes together.

add-flour-450x337.jpg


With the dough nice and soft, you can begin rolling the circles and logs needed to form the bunnies. There's no easy way to do this...I just dove right in. Ideally, you want 30 1-inch and 30 3/4-inch circles (so you can make 30 cookies), but make as many as you can. If you have kids in the kitchen like me, you may end up short on dough...

roll-and-cut-logs-450x337.jpg


Wow! That was a lot of rolling...Time to assemble the bunnies.

balls-and-logs-450x600.jpg


Using one 1-inch ball, one 3/4-inch ball, and two logs, form the bunnies on the cookie sheet. Be sure the pieces touch each other, so they form one cookie as they bake.

form-bunnies-450x337.jpg


Continue making the bunnies until you run out of dough. Hopefully you end up with 30 cookies. I think I got pretty close. They look so cute!

ready-for-oven-450x337.jpg


Bake the cookies at 350 degrees F/175 C for 10-13 minutes. When they start to brown slightly, they're ready. Let them cool completely.


cool-on-rach-450x337.jpg


If you would like to add tails, place a marshmallow onto each cookie and continue to bake them for another minute or two. When the marshmallows begin to melt slightly, take them out of the oven and let them cool.

add-marshmellow-tails-450x337.jpg


To make icing, combine the powdered sugar, butter, and vanilla in a medium-sized bowl. Slowly add milk until the desired consistency is reached.

make-frosting-450x337.jpg


Add the icing to a decorator bag, and decorate the bunnies as you wish. Some eyes, a nose, whiskers, and ear outlines was enough for me.

decorate-bunny-faces-450x337.jpg


They're almost too cute to eat! Here's wishing you a "hoppy" springtime...Enjoy!


Sources: http://www.landolakes.com/recipe/681/bunny-carrot-cookies

http://www.landolakes.com/Blog/carrot-cookies-for-any-bunny
 

sister herb

Official TTI Chef
Baby Fruit Salad

baby+shower-19.jpg


Supplies needed:
watermelon
cantaloupe
grapes
strawberries
toothpicks
pacifier
*ribbon, if needed
serving tray or covered cookie sheet


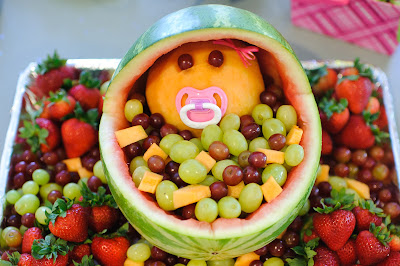
Cut watermelon in half but only 2/3 of the way down lengthwise as shown in the picture. Scoop out all of the melon and set aside to serve separately.


Cut a cantaloupe in half. Only used one half for the face. Clean off seeds and cut off peel. I used a 1/4 tsp. measuring spoon to core out eyes and hole for pacifier. Place toothpicks in eye sockets to secure grapes for eyes. Place pacifier in mouth hole and secure with toothpicks if needed to hold it up.

Place fruit head in watermelon bassinet and surround with fruit. I added a bow out of ribbon for a little extra decor. Put watermelon on serving tray or covered cookie sheet and surround with remaining fruit. I served the watermelon in a separate bowl to the side. Enjoy!!!!

baby+shower-18.jpg


Source: http://www.mandatorymooch.com/2012/06/baby-shower-fruit-bassinet.html
 

sister herb

Official TTI Chef
No-Bake Chocolate Coconut Cookies (with kids, definitely)

No-Bake-Chocolate-Coconut-Cookies-Animals.jpg


Ingredients:

3 1/2 cups of powdered sugar (almost one 16oz box)
3/4 cup of unsweetened cocoa powder, plus more for dusting
1 can of sweetened condensed milk (14oz)
3 tsp vanilla
1 1/2 cup coconut
1/2 cup pecan chips, or very finely chopped pecans

Directions:

1. Adult prep: Open the condensed milk. Open the bags or boxes (assuming they are new and sealed) of powdered sugar, coconut and pecan chips. Measure vanilla into bowl, if too challenging for the child.

2. Measure the powdered sugar. If you don’t want to use the entire 1lb box or bag, have your child dump the entire box or bag into the bowl. Then have them remove 1/4 cup.

3. Add 3/4 cup of unsweetened cocoa.

4. Stir until combined.

5. Add sweetened condensed milk. It’s helpful to teach your child how to spatula out the remainder in the can.


6. Add the vanilla.

7. Stir the mixture. You can start with a spoon, but it will be come very sticky and a little tough.

8. Add coconut and pecan chips. Stir until you almost have to knead it. If you think your child will enjoy it, let them do it with their hands. I will warn you that this is messy, but we sure laughed a lot.


The dough sticks like crazy to their fingers. But, this kids recipe makes so many little cookies that it won’t matter if you have to wash some down the drain. She called these her monster hands. Her fingers totally disappeared in the dough and I had to spatula it off.


9. Chill the dough for about 30 minutes. Afterward, it will be easier to work with.

10. Roll into small balls. A little goes a long way, so I would suggest about the size of a quarter at the most.

11. Coat balls with unsweetened chocolate.


Source: http://lajollamom.com/2011/03/kids-recipes-no-bake-chocolate-coconut-cookies/
 

sister herb

Official TTI Chef
Chocolate Pasta with Peanut Butter Meatballs o_O

chocpasta1.jpg


Ingredients


½ pound chocolate pasta (See Note)

For the “meatballs”

2-3 small peanut butter cookies (if you don’t have cookies around, round chocolates, such as Lindt, would work well too)

For the sauce

1 cup (2 sticks) butter
¾ cup Old Fashioned Crunchy peanut butter (for a nice, “meaty” texture)
1 teaspoon vanilla extract
3 cups confectioners’ sugar, sifted
8-10 tablespoons milk or cream
For garnish (optional)
Shredded coconut

Procedure


1. First, prepare your frosting-sauce. Cream butter with electric mixer. Add the Old Fashioned Crunchy peanut butter and vanilla. Gradually add sugar, one cup at a time, beating well on medium speed. Add about three cups of the sugar, bit by bit, scraping the sides of the bowl often. Add milk, one tablespoon at a time, and beat at medium speed until it is of a consistency slightly more runny than a buttercream frosting, but not so much that it drips–think the consistency of a thick soup. The texture will become a little bit melty once poured on top of the pasta. You may have extra sauce, but it’s always better to have too much than too little, no?

Place the prepared sauce to the side.

2. Prepare your “meatballs”–you’ll want exceptionally cakey cookies. Using your hand, form the cookies into balls–if they are too crumbly, you can mix them briefly in a food processor with a small bit of your prepared sauce, and they should then be easy to form into balls. Prepare the pasta per the packaging instructions; drain and let cool for a few minutes.


3. While the pasta is still warm, but not super hot, place the cookie “meatballs” on top of the pasta. Ladle on your desired amount of frosting-sauce, and for a shaved Parmesan look, top with a few bits of shredded coconut. Serve warm.


Source: http://ilovepeanutbutter.com/recipes/chocolate-pasta-with-peanut-butter-sauce/


Note:

Chocolate Pasta

Step 1: The Ingredients


This recipe is from the Australian Women's Weekly Pasta Cookbook 1994

Serves 4 people

1 cup of Plain Flour
2 eggs, lightly beaten
60g (2oz) Dark Chocolate
2 Tbsp Cocoa
1 Tbsp Icing (Powdered) sugar

Add all the ingredients into your food processor and process until mixture forms into a ball.

Step 2: The Kneeding


Turn onto a lightly floured surface and kneed for 10 minutes until smooth.

Step 3: The Rolling


Split the dough in half and work with half at a time.

Flatten pasta out with hands slightly and roll on widest setting in pasta machine. Fold over, and repeat, occasionally changing the rolling width. This stablises the dough for when you roll it thin. As it gets closer to the thickness you want, you can drop the folding over step.

If you don't have a pasta machine, you can roll this out with a rolling pin.

Step 4: The cutting


Put your water on to boil at this point. I didn't salt the water as I wasn't sure how the salt would effect the taste of the pasta.

Once you get your dough to the thickness you want (i got it down to about 1mm) cut pasta into the length you require. I cut my pasta sheet in half. You can of course choose to not cut it at this stage, or cut after it has been put through the machine again.

In the pictures, I put the pasta through the spaghetti size cutters, however, I think it would make a better fettucchine.

So, cut your pasta at the size you want. If you aren't using a pasta machine you can roll the pasta sheet firmly and cut into the desired width and unroll the cut slices.

Source: http://www.instructables.com/id/Chocolate-Pasta/
 

sister herb

Official TTI Chef
Buckeye Peanut Butter Spider Candies

spider-buckeye-easy-recipe-cherylstyle-B7.jpg


Makes: approx 2 dozen

  • 1 lb sifted powdered sugar
  • 1½ cups creamy peanut butter
  • ½ stick unsalted butter, softened
  • ¾ pkg chocolate candy coating
  • swirl pretzels broken into 3 pieces
Let's do it
  1. Hand mix peanut butter, butter and powdered sugar to form a smooth-yet-stiff consistency.
  2. Shape dough into 1½" diameter balls then place on baking sheet lined with parchment or wax paper.
  3. Break pretzels into leg-sized pieces and insert into peanut butter balls, 4 on each side.
  4. Place baking sheet in refrigerator to harden, 20–30 minutes.
  5. Melt dipping chocolate per package instructions.
  6. Remove baking sheet from refrigerator. Use spoon to apply small dollop of dipping chocolate to top of spider bodies. Apply 2 round sprinkles for eyes, refrigerate spiders an additional 30 minutes to set then your spiders are complete!
  7. As an alternative, purchase donut holes, insert pretzel legs and attach candy eyes to make these goofy but spooky spiders!

Source: http://www.cherylstyle.com/showcase/easy-buckeye-peanut-butter-spider-candies-recipe/
 

sister herb

Official TTI Chef
Apricot Clownfish
hamecon2.gif


apricot-clownfish-recipe-photo-420x420-cl-004.jpg


2 dozen dried whole apricots

15 white candy melts

12 mini chocolate chips

Makes 12 fish

How to make it

Line a cookie sheet with waxed paper.

apricot-clownfish-How-to-135-one-1.jpg


For each fish, cut 2 apricots as shown.

apricot-clownfish-how-to-135-two-2.jpg


Then, remove the smallest piece from the first apricot (reserve these pieces to add to trail mix or granola) and arrange the remaining four pieces on the waxed paper, as pictured, to create a fish shape.

Heat the candy melts in the microwave, following the directions on the package, and stir them just until smooth.

Working with one fish at a time, dip the cut edge of the first apricot piece into the melted candy. Then place the dipped piece back down on the waxed paper and push the second apricot piece firmly up against it.

Next, dip the cut edge of the third piece and press it against the second piece. Finally, dip the rounded edge of the fourth piece into the melted candy and push it in place to create the fish's tail.

Once you've assembled all of the fish, use the tip of a toothpick to poke a hole in each one where the eye will go. Press a mini chocolate chip, tip down, into each hole.

Place the tray in the refrigerator for a few minutes until the candy firms up again.

Source: http://spoonful.com/recipes/apricot-clownfish
 

sister herb

Official TTI Chef
Chocolate Covered Strawberry Carrots


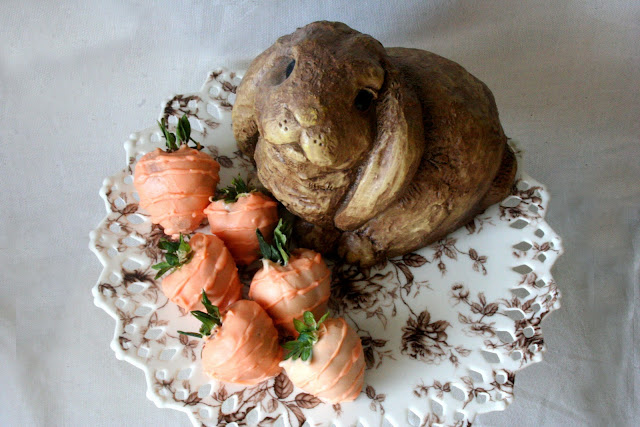
(A rabbit is optional when serving them.
white-rabbit-31.gif
Don´t eat her.)

To make the carrots, heat some white chocolate in a separate bowl and added a few drops of red and yellow food coloring. Dipp the strawberries in the bowl, and then with a skewer cover the tops of the strawberry where any red was still showing. Then with the same skewer, add the carrot lines. Your lines don’t need to look perfect to get a carrot ridged effect.


Aren’t they the cutest chocolate covered strawberry carrots you ever did see?


Source: http://www.homestoriesatoz.com/uncategorized/chocolate-covered-strawberries-for-easter.html
 
Top